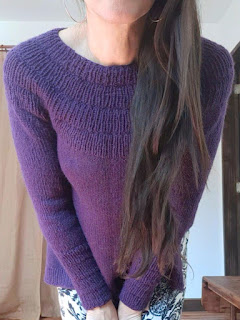
Anker Arabella Hybrid Sweater/ Suéter Híbrido Anker Arabella
I've had a rough two weeks that finished with some days at the hospital but I'm back feeling well. I can finally post "my" latest design.
Las últimas dos semanas han estado intensas. Terminé internada en el hospital pero ya estoy mejor. Por fin puedo compartir "mi" último diseño.
Not really mine, since I mixed two designs that I've enjoyed knitting:
For the yoke: Anker Summer Shirt.
For the torso: Arabella Sweater.
For the sleeves: my own special touch: long sleeves that mimicked the yoke (just like I did for the first Anker I made; the original design has short sleeves).
Bueno, no es realmente mío porque es un híbrido de dos patrones que me gustan mucho:
Para el cuello: Anker Summer Shirt.
Para el torso: Arabella Sweater.
Para las mangas, le puse de mi propia cosecha: hice mangas largas y repliqué la sección del cuello (tal como lo hice la primera vez que hice el Anker, que tiene mangas cortas).
How to knit this hybrid:
Followed my notes for the version of this sweater I made during lockdown.
Using 4.5mm circular needles (US size 7), I CO 100 stitches and knitted 10 rows for the first tier of the yoke. Then, increased to 132 for 2nd tier; 178 for third tier, and 226 for 4th tier. I used a "no hole" raglan increase in RS rows for 8 rows. Then, divided 48 stitches for each arm and 65 for each front and back.
Cómo tejer este híbrido:
Seguí mis notas del primer Anker que tejí durante la pandemia.
Usando palillos redondos de 4,5mm, urdí 100 puntos y tejí 10 corridas para la primera sección. Luego aumenté a 132 para la sección 2; 178 para la 3; y 226 para la 4. Hice 8 corridas de un raglan "sin hoyos" para llegar a la axila. Luego, dividí el tejido en 48 puntos para las mangas y 65 para el torso y la espalda.
For the torso, I wanted to make a trapeze shape (like Ann McCauley's Arabella sweater). I switched to knitting back and forth instead of in the round. The trapeze shape of the front and the back, knitted separately but in the same manner: first, a section that flares outwards from the bust down, then, a second section that is straight down.
Para el torso, quería una forma de trapecio (como la del suéter Arabella de Ann McCauley). Tejí por separado el frente y la espalda, en vez de circularmente. La forma del trapecio del frente y de la espalda tiene dos secciones tejidas de la misma manera. La primera está compuesta por dos líneas diagonales que se alejan del busto hacia abajo. La segunda se teje derechamente hacia abajo.
To make the front and back, I added 2 stitches at the beginning and end of the first row (increasing to 69 sts), then I increased 1 stitch at the beginning and end of every 3rd row 15 times (46 rows), which helped keep the flare-out line even.
At this point, the rest of the sweater is really simple; knitted straight down. Since this section stays open, it is important that it doesn't curl inwards. To help keep it straight I did two things: first, I knitted every first and last stitch in every row; second, I purled the second and second-to-last stitches on the RS (knitting them on the WS; see pictures below). I knitted 44 rows (about 6.75 inches) in this manner, and then finished with 10 rows of 1x1 rib before casting off.
Para tejer el frente y la espalda, agregué dos puntos al principio y al final de la primera corrida del torso, aumentado cada parte de 65 a 69 puntos. Después, para las líneas diagonales aumenté un punto al principio y al final de cada 3ra corrida 15 veces (46 corridas), para crear una línea pareja hacia afuera.
Lo que sigue del suéter es bastante simple: se teje derecho hacia abajo. Para evitar que los lados (que quedan abiertos) se enrollen, hice lo sgte: tejí un punto derecho en cada primer y último punto de todas las corridas y tejí un punto revés (por el lado derecho y derecho por el lado revés) en el segundo y el penúltimo punto de cada corrida (ver fotos). Tejí 44 corridas de esta manera (alrededor de 16,5cms de largo) para luego terminar con 10 corridas de punto elástico simple.
I seamed the diagonal lines and wet-blocked the bottom of the sweater. I love it! I think it looks great and it's super soft (knitted with Indiecita Baby Alpaca) and comfy.
If you have questions about it, contact me here, on IG @knitplantlove or on through Ravelry I'll be happy to answer questions if the instructions are unclear.
Para terminar, cerré las líneas diagonales y bloqueé con método "mojado" la parte abierta del suéter. ¡Me gusta mucho como quedó! Creo que se ve lindo y es súper cómodo y suave (tejido con Indiecita Baby Alpaca).
Si quieras replicarlo y tienes preguntas, puedes contactarme por acá, en IG @knitplantlove o a través de mi perfil de Ravelry, feliz contesto las dudas que te puedan surgir si mis instrucciones no son claras.


Comments
Post a Comment